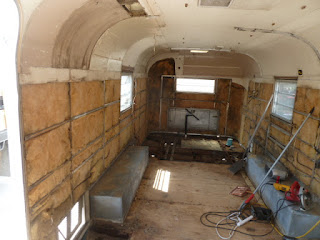
Friday, September 23, 2011

Huntin' for a needle in a haystack.....Bingo!


Notice those square tail lights? Those are Deitz 161 tail lights and from what I understand they used to be used on all sort of trailers back in the 60's. I mean they were on everything. Now...you can't find one anywhere. Or at least not very easy.

I finally sent Tom Patterson, an avid Streamline and Silver Streak collector/restorer, an email to ask if he knew of a source for these Deitz 161 lenses. Bingo....He turned me on to a guy in Pennsylvania that happened to have one whole assembly and one lens left, so I immediately told the guy I'd take them. Will ship out tomorrow. Should have them next week. 

The lenses on the trailer are in fair condition, but I wanted to have some new ones or at least a couple of spares. 

Tom Patterson has made a mold for the Streamline logos that are on the front and back of the trailer and has new cast aluminum logos for sale. I'll order those later on when I start working on the outside.

So far I've ordered a new power outlet, new power converter/breaker panel, new insulation and new plywood and epoxy for the floor. 

I got part of the belly pan cut out yesterday. Next week I'll work on beefing up the frame and curing some of the rust.

Until then.....

Overthehump

Thursday, September 22, 2011

Dealing with Life....

It's been a couple of days since I've worked on the 'New Mex-i-can'. Had to tend to life stuff, like shopping for things to use in the trailer, move welders around, clean the shop of a bit, change shocks out on the Dodge, go to the movie, dine out with my wife (El Cabellero's green chicken enchiladas - very hot & good), and board up our building that some local punks broke into. Don't think they stole anything that I could tell. Just busted the door and made a mess, so I had to put a piece of plywood over the door until I can replace the door frame. Such is life!

I'll probably replace the front shocks on the Dodge today and maybe get some welding done on the frame of the 'Mex-i-can'. I reinstalled the lock hasp so I could secure the inside of the trailer when we're away.

I did get the shocks replaced. Getting the old ones off was a wee bit frustrating but finally got them off. Installing the new ones was a breeze. New tires and new shocks, the truck should ride much better now. We'll even test it out this weekend going to Albuquerque.

I removed the back portion of the belly pan on the trailer so I could get at the frame to add some new metal and beef up the frame. Didn't get any welding done either. Sorry, no pictures today.

Won't work on the project anymore this week. Start up again next week.

Until next time.....

Overthehump

Tuesday, September 20, 2011

No actual work on trailer today!

I didn't do any actual work on the trailer today. Went to Hobbs and bought 6 sheets of 3/4" plywood from Lowe's and enough epoxy to coat the plywood from Sherwin Williams. When I returned to the shop I straightened up some of the mess that has accumulated the past few weeks.

I unloaded the 4 wheelers to use my trailer to retrieve my welder from my old shop. This is a new Lincoln Precision TIG welder I purchased a year or so ago and have never used. Now I just have to learn how to use it. May have to break out my trusty old Miller MIG welder. My learning curve will be much smaller since I've used it quit a lot in the past. Just haven't welded in quite some time, so I'm sure my welds will be works of art. LOL

I bought some knotty pine closet liner planks to stain and varnish to see what we might like to go back with on some of the walls. I used a Minwax golden pecan stain on one of them and a golden oak (don't remember what brand) on another. The Minwax golden pecan looked the best for what we like. Has more of a cherry wood look while the golden oak seemed to have some tinge of green in it.

I did read a ton of posts about different showers people have put in airstreams. An architect that remodeled an old airstream used tile in his shower and bathroom. I had seen his pictures before:
but I finally stumbled onto his blog where he described the products and technique he used to put the tile in. Made me rethink what I might do in the shower???


That's about the extent of my progress today....not much. Maybe more tomorrow.

Until next time.......

Overthehump

Monday, September 19, 2011

Back at work....drilling out rivets. Have to be Nearing the end!!!

Started drilling rivets again to remove the 2 ceiling panels on each side of the roof. I plan on leaving the middle panel (famous last words), but have to remove the outside ones so I can remove the fiberglass end cap and reseal all the seams in the front. There were a bunch of rivets over the door and on each support beam on either side of the door, spaced about 1" apart which equals a lot of rivets. I finally got all the rivets loose and the panels down. I removed all the old insulation that I could reach and will replace each small panel of insulation with new Prodex insulation.

I began to itch from all the insulation that got on me while I was removing it from the walls, so I decided to quit for awhile and shower off to get some of this fiberglass off me. I'll let all the fiberglass dust settle and go back out later and do some more, but for now it is break time.

I got the insulation in along with the double sided tape
  

and Prodex sealant. 

The electric power converter box also came in Friday. Whoa...I got another one in the mail today. Somehow they shipped me 2 of them. I called the lady and will ship it back to her. She said she'd reimburse me for the shipping and give me a 5% discount off the price of the one. Cool deal.

Now I just have to figure out how to get all this stuff back together. LOL

Here's some pictures of the rivets over the door.

These are on the front side of the door. 

These are on the back side of the door. There were a lot of rivets in this little section!

 I nearly have the front fiberglass end cap out.

Here the end cap is removed and most of the insulation removed. I still have some insulation to remove but I ran out of tubs and space in the dumpster.

The black lines in the curvature of the trailer is where the leaks are coming from. I'll have to re-seal the seams before I put the end cap back on.


I think most of the wiring will be accessible now, so I'll be able to re-wire it more easily. Before, when I was going to leave the ceiling on, it would have been tough to re-wire some of it, so I think it worked out best to take part of the ceiling off....even though I didn't really want to.

Until next time....

Overthehump

Sunday, September 18, 2011

Driving only

 Friday: Well, I didn't get to work on the trailer today. I drove to Weatherford, Tx to visit my brother Jeff and attend a swap meet in Decatur on Saturday. It was a long 6 hour drive from Lovington. I was pretty short on diesel when I left and got $50 worth in Lamesa @ $3.89/gal. I figured that would get me nearly to Weatherford or somewhere closer where the diesel was less expensive. Yep, I was right. I saw diesel for $3.65, $3.71, $3.79 but passed them all up. I was beginning to worry that I had passed up all the cheaper places. I was going through Abilene and saw diesel as cheap as $3.65 and had serious thoughts about making a u-eee but thought I'd check the Walmart first. Good thing I did cause it was $3.42 there. You guessed it....I filled up there. Cost me about $220 to fill up but that should carry me about 1000-1200 miles.

 Jeff's Office:
  

Hard at work:

I got to Jeff's place about 5pm. We visited while he was finishing up some work. Before he finished, it came a turd floater, first good rain they'd had all summer. As you probably know, Texas is dry and a lot of it is on fire, so they really need the rain. They need it just as bad as we did, maybe worse. Anyway, we hopped in the truck during a lull in the wet stuff and went to get some BBQ. First place we went to, Outlaw's BBQ that's near his house, was out of ribs and brisket. I don't think they were prepared for a Friday night being out of food! So we hopped back in the truck and drove across town to Mesquites. I had a ribeye steak and Jeff had Caliente Chicken. Both were very good and I ate all of my steak. Boy was I stuffed.


Spent the night at Jeff's. He's got a really nice place. The road into his place is really narrow and needs some work. But they are building a new by-pass that will be within a 100 yards of his driveway when they finish. I don't know where the access road to the by-pass will be, but it will make his place a lot easier to get to.

Saturday: Drove to Decatur to see what I could find at the swap meet. Here's some pictures of the swap meet:

Vendors of all sorts. You can buy almost anything at a swap meet.

47 Chevy Pickup....ready to restore. Engine had been rebuilt.

Just a very neat old Mack Truck!

I bought some gloves, rags, and an old Oldsmobile hood ornament that I may make into a light for the camper. I'll post a pic later. I don't have a clue as to what year the hood ornament is. Somewhere in the 50's.

Drove to my mom's and spent the night with her and came home today. Had a nice visit with my mom. I fixed her door while I was there. I'm ready to get back to work on the trailer tomorrow.

Until then....

Overthehump

Thursday, September 15, 2011

It's Leaking

We got an inch and a half of rain last night and it cooled off a lot. We needed the rain so bad. That's the most rain we've had at one time in over a year. Previously we've had about .3" of an inch and that was in two rain showers. It's been right at a year since we've actually had some good rain.

It's not all good news though. I went out to the camper this morning to check things out and sure enough, it had leaked. You can see where the water got the floor wet in the front corner on the curb side.


 The driver side didn't seem quite as wet as the other side but this is where the most floor damage is, so I'm gonna assume that this side leaks just as bad or worse.

 Anyway, it prompted me to go ahead and remove the front interior fiberglass that covers the curved part of the trailer. I really didn't want to do this but I'd better do it now or forever be fighting leaks. So I had to drill more rivets, not just a few mind you, but a bunch of them.

I had to take off the curtain rails that you can see in the above picture. Had to take the lights off the shelf, too.

The shelf had rivets, the curtain rails had rivets, the angle brackets that held the shelf on had rivets and the textured pieces that match the rest of the ceiling had rivets. Then when I got those off, the textured ceiling sheets that run the length of the trailer had rivets through the front fiberglass piece.
 

I thought when I got all the visible rivets drilled out the end piece could be popped out. No such luck.

The fiberglass end piece has rivets underneath the textured ceiling panels. So I guess I'm forced to remove the ceiling panels that are on each side. Hopefully I'll get to leave the middle piece. I sure wasn't expecting to have to remove any of the ceiling panels. Oh well, I'll be able to insulate part of the ceiling with better insulation.

These front seams are the ones that are leaking. When I finally get the front end piece off, I'll be able to seal each seam with some Prodex sealant.

And that's all for today. It will probably be a few days before I get to work on the trailer, because I'm going to the swap meet in Decatur. I'm looking for a cab over engine (coe) truck to put on my 96 Ford F350 flat bed to pull the camper with. 

Until next time.....

Overthehump

Wednesday, September 14, 2011

Finally.. all the panels are off the walls!

Dang, I woke up @ 3:30 this morning. That's just too early to get up. So, I lay there 'til a little after 4 before I got up. Patsi got up a short while later and we went to breakfast at Main Street Cafe this morning. We both had a big breakfast to start the day off. I got into the trailer shortly after we got home from the restaurant. I took the rest of the exposed insulation out of the wall cavities. I decided to leave the roof panels on, so I won't be tearing those off.

I still had to remove all the front panels forward of the door, so I started drilling rivets again. I got all the front panels off just about the time it started thundering in the distance. Wow, it might even rain.

Well, it rained....about 3.38 minutes! Barely enough to get the ground wet, and then the clouds were gone. Maybe a few remained but for the most part, it wasn't cloudy any more. It has been cooler today and I'm thankful for that. We still have chances of thunderstorms this evening, so maybe, maybe we'll get some rain.

Made a trip down to our local hardware/lumber store to see what they had to treat rust. I've read all the posts in the forums about POR-15, Rust Bullet etc, but I didn't want to have to order something,  run out and then have to order some more. I sure don't have any idea of how much I'll really need. Plus, this trailer has made it 43 years and I'm sure what I do will at least prolong its life for as long as I'm around. After looking at a couple of products I decided on 'Rust-Away'.

Here's a shot of the part of the frame that I treated this afternoon. It's supposed to dry to a black color in 30 minutes and you're supposed to apply a second coat. According to the directions you don't need to do anything else, no painting, no washing or anything. Notice the treated area is turning black and the untreated is still rust color.

The green in this shot is some Rust Away that hasn't dried.

Haven't treated this side yet.

This is looking from the front of the trailer with all the insulation removed.

The front section still has the insulation. I ran out of room in my trash bin and didn't want to fill up another tub. I have 2 full tubs already.

I ordered some Prodex insulation last night, along with some double sided tape and some seam sealer that is supposed to be really good. According to all the forums I've read on insulation Prodex insulation is supposed to be one of the best for insulating a trailer. If installed right, should have an R-value near or greater than 15. The trick is to install it right, which I will attempt. 


Tuesday, September 13, 2011

Rotten Floor Gone....Rotten day!

I got out early this morning to get some stuff done before it got too hot. I swept up some of the dirt and rivet heads to sort of tidy things up a bit before I got started. Looked things over and decided to cut the floor just past the rear of the wheel well (towards the front) to reveal the cross support member. I decided to replace the floor in sections instead of tearing the whole floor out and then replace everything. This way I'll replace the rear part, tear out another section and replace it. My reasoning behind this is that the floor's thickness (3/4") is part of what holds the shell up, so I didn't want to remove everything and then have to somehow jack up the shell to get the floor to slide under between the shell and the belly pan. It's still gonna be tough but I think this way will be a little easier and maybe safer. 

I removed all the exposed insulation.

On both sides.

It's fairly clean from the wheel wells back now. Got in there with the water hose and washed everything down. There was 43 years of dirt, dust, debri, and other assorted material.

I was covered with fiberglass dust early so I cleaned up, because I was itching pretty bad. The day kind of went downhill from there. 

Patsi had to go to Hobbs, so I backed my pickup into the empty part of the shop and proceeded to remove my old shocks to be replaced by the new Rancho adjustable shocks I had purchased last month. First, I didn't have the correct size wrench for the nuts on the rear shocks. I looked all over for a 13/16" or 21mm end wrench and couldn't find one in my array of tools. I did have a 21mm and 13/16" socket but I really needed two box end wrenches. 

So, I had to go see a friend and borrow one from him. Went back to the shop and got everything positioned again. I was lying on the creeper trying to get the wrench and socket positioned and somehow the 1/2" ratchet with the 21mm socket dropped straight down and smacked me right square in the mouth just below my nose. Boy that smarted....I think I saw a few stars there for a minute. I was pretty pissed but finally realized this just wasn't my day for doing this little project. So, I spit out the blood, went inside and iced my lip for a little while and cooled off. I decided I'd just take the rest of the day off. 

So....I did. 

Looking back on it, it was sort of comical....but my lip is still sore. When things aren't going right, you might as well quit and start over at another time.

Until next time....

Overthehump

Monday, September 12, 2011

Got to start on the floor....

Got started the this morning while it was still cool. Still had plenty of rivets to drill out and managed to get all the panels off the rear of the trailer and also off the curbside up to the door. I'm really amazed at the amount of rivets that was used in putting this trailer together. But, it's better to have plenty of rivets to hold everything together than have too few and the old trailer begin to fall apart. But it sure makes it quite a job to remove all the panels. It's not too bad when it is cool but when the temperature begins to rise, I begin to sweat like a stuck pig, drops of sweat running off my brow into my eyes, onto my glasses and I'm constantly trying to wipe my eyes clear which makes the job even more undesirable.

I got started on the floor right after lunch and it was already getting pretty warm. I did get the rear part of the floor which used to be the bathroom out and clean up a little. I think I'll wait until in the morning before I do much more.

This is where I left off yesterday:

Can you believe this used to be the inside of the camper?? I never believed there'd be so many pieces.
This used to be the bathroom floor. It was pretty rotten!

Just another view of the old bathroom floor.

 Both sides, rear panels, bathroom floor and wheel well covers removed.

Better view of the floor removed.

Looking from the front of the trailer to the rear.

I haven't decided whether or not I'm going to remove the ceiling panels to replace the insulation up there or not. If I totally replace all of the wiring I'll just about have to remove the ceiling panels to get to the wires. I would like to replace the insulation throughout the trailer and also all the old wiring, but I'm not sure I'm up to removing the ceiling panels and the fiberglass end caps. I can replace the insulation on the sides but if I don't pull the ceiling panels I'll have to use the old wiring in the top and leave the old insulation.  Another plus if I pull the ceiling and the end caps is that I can seal all the seams front and rear where the aluminum is curved on the corners. Guess I'll end up making up my mind in a few days.

Until next time....

Overthehump

Sunday, September 11, 2011

Is it unpatriotic to work on Sunday 9-11?

10 years ago today I was worried that my brother in law was at work on Wall Street where his office is right across the street from the World Trade Center (or where they were). We were wondering if he was ok or if he was even still alive. Patsi finally got in touch with him about 10 am and he had done some work at home that morning and was running late getting into the office. We were relieved and blessed that he was ok, but very saddened by the events that unfolded that day.

We watched some of the ceremonies on tv this morning, but I finally went out to the trailer to start drilling rivets again. I only have about 1000 or so to go. lol  I did get one wheel well cover off and got all the aluminum sheets stacked up and stored in the order that I removed them.
Most of the panels off on the driver side. Most of the wiring is exposed.

I did manage to get one section off on the curb side.


Driver side wheel well removed.
I'm hoping that I don't have remove the top panels. I'm kind of getting tired of drilling rivets. But I'm sure when I start to put things back together I'll get tired of using the rivet gun. Such is the life of one that takes on projects.

I ordered a new breaker panel and power plug for the trailer today. I've been looking at pneumatic rivet guns but haven't decided on which one to buy. Will have to decide pretty soon, because I'm going to need it soon.

A few more panels to remove and then on to removing the floor.

Until tomorrow.....

Overthehump

Saturday, September 10, 2011

Ho Hum kind of a day....

Well, it was one of those days. Ho hum. I gathered up all my tools and miscellaneous pieces that was in the trailer, then took the water hose and sprayed down the inside of the trailer. That got rid of most of the dust, mold, and lots of yuck. It's not spic and span but it is a little nicer to work in, but I didn't do much more today.

Patsi was having a group of ladies over to make cards and I had promised to BBQ burgers for the girls. So about 9 I made the burger patties, cut some onion and then started the fire about 10. Made some guacamole just before I put the burgers on. They were ready by noon and the girls were just about ready to eat. We had a feast for lunch.

I went shopping locally for plywood, epoxy paint, pneumatic rivet gun, and didn't find one thing. Well, maybe I found some plywood I might use, but I'll have to coat it with epoxy first. Guess I'll just order a rivet gun and some epoxy. I need to get lots of rivets and some POR-15 to coat the frame.

I did remove a couple of sheets of aluminum off the walls this afternoon. Other, than that, I didn't do too much today. Sorry, no pics today.

Overthehump

Friday, September 9, 2011

Poof, Shower be gone.....

Wish it were as easy as waving my trusty Harry Potter wand and saying the magic words. But, here in the now, in my reality, I have to use my trusty battery operated drill to drill out all these rivets holding everything together. It just isn't as quick as the Harry Potter wand method, but it's all I've got. LOL

As I was tearing (not literally) all the pieces apart, I realized I needed to be taking some more pictures. I had to quit and run into the house and get my camera. Oh yeah, I installed the new vent covers I had purchased before I got started on the shower because the old sun dried ones were so brittle they had blown off on the trip home from California. My duct tape job had at least kept the rain out.

Off to take some pics and try to get everything sort of swept up and begin to take out the floor. Pics will be forthcoming.

Well, the shower is out. Took me a while to find all the places it was riveted in. Then when I got it loose, it wouldn't go through the door. I knew it had to go through there because it had been put inside. Finally after wrestling with it for awhile I got it turned just right and was able to angle it out.

 Here's a shot of the end of the trailer with the shower gone.


Most of the carpet gone. Can you tell how rotten the wood is? 

This is where the shower used to set, wood is just about gone.

Someone either lost a puppy in the belly pan or this is a racoon or some other varmit skull. Not sure what the bone on the left is, hip bone maybe???

This is where I found the skull, underneath the shower.

Cut out some of the wood where the frig used to be.

Pulled some of the rotten wood out where the hot water heater used to be.

I had a septic tank truck come suck out the black water tank. The dump valve on the tank is inoperable and I'm really looking forward to replacing that. Any volunteers will be greatly appreciated. lol

I need to remove some of the inside panels now and finish removing the floor. Slow but sure....making progress.

Oh yeah, we decided to name our trailer and came up with the name 'New Mexi-can'. Inside will definitely have a southwest flair to the decor.

Overthehump